How to Identify Weak Points in Your Basement Waterproofing Defense

A dry basement rarely stays dry by accident. In most homes, it stays dry because several systems, materials, and site conditions are all doing their jobs at the same time. When even one of those pieces starts to slip, moisture usually finds the gap before the homeowner does.
That is what makes basement water problems so frustrating. The weak point is not always obvious. A puddle near one wall may actually start with clogged gutters on the opposite side of the house. A musty smell may trace back to condensation, not a foundation crack. Efflorescence on a block wall can signal chronic moisture movement even when you have never seen standing water. Basement Waterproofing is less about one miracle fix and more about understanding how water behaves around your property, then spotting where your defenses are thin.
I have seen basements that looked structurally sound but took on water every spring because a downspout ended three feet from the footing. I have also seen homeowners spend heavily on interior drainage when the real issue was an exterior grade that pitched water toward the foundation like a funnel. The lesson is consistent: before you fix anything, identify where the system is vulnerable.
Start by thinking like water
Water is patient. It moves downhill, follows the easiest path, builds pressure when trapped, and exploits tiny openings that seem insignificant in dry weather. If the soil around your foundation becomes saturated, hydrostatic pressure can push moisture through pores in concrete, through mortar joints, through tie rod holes, or through hairline cracks that looked harmless in July.
That is why an effective inspection starts outside, not inside. People often begin in the basement because that is where the symptom appears. The cause is frequently in the roof drainage, the yard slope, the hardscape, or the soil conditions surrounding the house.
A useful mindset is to picture your home during a hard rain after several wet days. Where does roof water land? Where does it travel? Does it disperse safely away from the foundation, or does it collect near the walls and soak into the backfill? The more accurately you can answer those questions, the easier it becomes to identify weak points in your Basement Waterproofing defense.
The first layer of defense is usually above your head
A surprising number of basement leaks begin with gutters and downspouts. When gutters clog, water spills over concentrated sections of the foundation perimeter. When downspouts discharge too close to the house, they dump hundreds of gallons into the same problem zone over the course of a storm. One inch of rain on a modest roof can produce a substantial amount of runoff. It does not take many storms for poor drainage habits to create saturated soil conditions.
Look for stains on siding, eroded mulch trenches below gutter edges, or areas where the soil is visibly lower because runoff has been carving the same route for years. If the basement leak tends to show up near a front corner, inspect the roofline above that corner first. The connection is often direct.
Extensions should carry water far enough away that it cannot simply circle back to the footing. In many yards, that means at least six to ten feet, sometimes more if the grade is flat. Buried drain lines can work well, but only if they remain clear and discharge downhill. I have seen plenty of buried systems that homeowners assumed were helping, when in reality they were clogged solid and backing water up near the foundation.
The soil and grade tell a quiet story
If I could choose only one exterior condition to inspect besides gutters, it would be the grade around the home. The ground should slope away from the house, especially within the first several feet. Even a subtle pitch in the wrong direction can send a tremendous amount of surface water toward the foundation over time.
This issue is especially common around homes that have settled landscaping beds, old flower borders, or walkways installed without enough pitch. After a few years, mulch builds up, topsoil gets added, and the area beside the house ends up higher than intended. In some cases, the siding or brick veneer sits uncomfortably close to the soil line. That is a red flag. Beyond moisture risk, it can also invite pest problems and accelerate material decay.
Clay-heavy soils deserve special attention. They drain slowly and hold water longer than sandy soils. When wet, they expand. When dry, they shrink. That cycle can increase stress on foundation walls and keep the perimeter damp for extended periods. If your basement gets damp after long wet periods rather than during the storm itself, the soil profile may be part of the problem.
Patios, driveways, and sidewalks can also become hidden weak points. A concrete slab that has settled toward the house turns into a hard surface collector that feeds water directly to the foundation edge. The homeowner may focus on a crack in the basement wall, while the real problem is a walkway outside that now slopes inward by half an inch over several feet.
What your basement walls are already telling you
Inside the basement, water leaves evidence long before it leaves a puddle. You just have to know how to read it.
Efflorescence is one of the clearest clues. It appears as a white, chalky residue on masonry surfaces and forms when water moves through the wall, dissolves mineral salts, and leaves them behind as it evaporates. Efflorescence does not necessarily mean active leakage at this moment, but it does mean moisture has been traveling through that material. It is a diagnostic sign, not just a cosmetic nuisance.
Peeling paint is another important signal, especially on walls that were painted to improve appearance rather than manage moisture. Paint can trap vapor or fail when pushed from behind by dampness. If the lower two or three feet of a basement wall show blistering or flaking, take that seriously. The wall may be transmitting moisture even if you never see dripping water.
A musty odor matters too. Basements often develop a stale smell from poor ventilation, but a persistent earthy odor usually points to elevated moisture somewhere in the space. Cardboard boxes softening at the bottom, rust on metal shelving, cupped wood trim, and dark staining on base of studs are all clues that the environment is more humid than it should be.
Here are some of the most reliable signs that your waterproofing defenses may be weakening:
- White mineral deposits on concrete or masonry
- Damp spots that appear after rain, then fade
- Musty smells that persist even in dry weather
- Rust on appliances, fasteners, or metal shelving
- Cracks that widen or show fresh moisture staining
None of these signs should be judged in isolation. A single hairline shrinkage crack in poured concrete may be mostly cosmetic. That same crack, if damp at the base after storms and paired with exterior drainage problems, deserves more attention.
Cracks are not all equal
Homeowners often focus on cracks first because they are visible and easy to worry about. That instinct is understandable, but it helps to separate cosmetic cracking from moisture pathways and structural concerns.
Hairline vertical cracks in poured concrete are common. Many form during curing or as the wall adjusts to normal settlement. Some never leak. Others become seasonal seepage points when exterior soil becomes saturated. Wider vertical cracks, especially those with staining or active dampness, are stronger candidates for repair.
Diagonal cracks can suggest differential settlement, particularly if they are wider at one end. Horizontal cracks in masonry or concrete are more concerning because they may indicate lateral soil pressure against the wall. In block foundations, stair-step cracking through mortar joints often deserves a closer look. If you notice wall bowing, inward displacement, or repeated cracking after previous repairs, that moves beyond a simple waterproofing issue and into structural evaluation territory.
One practical point that gets overlooked: many basement leaks do not come through the visible middle of the wall. They show up at the cove joint, the place where the wall meets the floor slab. Water can collect outside the footing and enter through that seam under pressure. A homeowner may see water on the floor edge and assume the floor itself is leaking. Often, the pressure is building outside and expressing itself at the joint.
Windows, penetrations, and small openings create oversized problems
Basement windows are frequent failure points, especially older steel or wood-framed units set into masonry openings. Window wells that fill with rainwater or snowmelt become mini reservoirs against the wall. If the well has no drainage or the drain is clogged, water rises until it finds its way through the frame, the surrounding mortar, or the sill.
Service penetrations deserve the same scrutiny. Water lines, electrical conduits, cable penetrations, and hose bibs all interrupt the continuity of the wall. The seal around them can shrink, crack, or separate over time. I have seen active leaks from holes no larger than a coin, simply because the soil outside stayed wet and the opening offered less resistance than the surrounding concrete.
Do not ignore the upper portions of basement walls either. Some moisture problems blamed on the foundation are actually above-grade entry points. Poorly flashed exterior steps, missing sealant at siding transitions, and splashback near rim joists can let water into the wall assembly, where it eventually shows up lower in the basement.
Humidity can mimic leakage
Not every damp basement has groundwater intrusion. Some have air and temperature problems that create condensation. This matters because the wrong diagnosis leads to wasted money.
If cold water pipes sweat heavily in summer, if ductwork drips, or if the basement floor feels clammy during humid weather, condensation may be part of the problem. Warm, humid https://donovanlwpm892.image-perth.org/how-hydrostatic-pressure-affects-basement-waterproofing air meeting cool basement surfaces can produce enough moisture to dampen materials and support mold growth, particularly in unfinished spaces. Dehumidification, air sealing, and insulation may do more than crack injection in that situation.
A quick clue is timing. Groundwater seepage often correlates with rain events, snowmelt, or prolonged wet periods. Condensation tends to worsen during hot, humid spells, sometimes even when it has not rained. Another clue is location. Condensation often appears on cool surfaces throughout the basement, not only along one wall or at one corner.
That said, mixed conditions are common. A basement can have minor seepage and high humidity at the same time. Good assessment requires separating the sources rather than treating every damp sign as a leak.
Sump pumps and drainage systems can fail quietly
If your home already has an interior drainage system or sump pump, do not assume you are protected just because the equipment exists. Some of the wettest finished basements I have seen had waterproofing systems that had technically been installed, but were no longer functioning as intended.
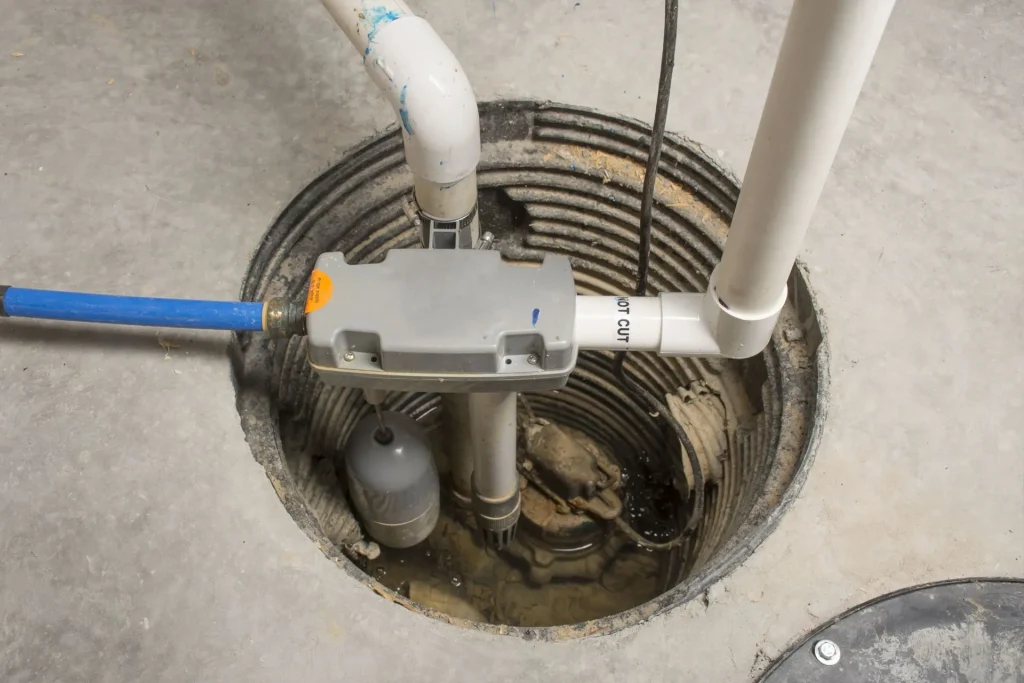
A sump pit should be inspected periodically. The pump should cycle properly, the discharge line should move water away from the house, and any check valve should be in working order. Battery backups need testing, not blind faith. During severe storms, power outages and peak groundwater conditions often happen together, which is exactly when an untested backup gets exposed.
Interior perimeter drains can also clog with silt or iron bacteria over time. If the system runs but the basement still develops damp edges or isolated seepage, the problem may be that water is not reaching the sump efficiently. Finished basements make diagnosis harder because drywall, flooring, and trim conceal early warning signs until the damage is broad enough to notice.
A homeowner once told me their sump pump was “working great” because they could hear it humming. The pit was full, the float was jammed, and the pump motor was running without moving water. By the time they discovered it, moisture had wicked into finished walls along twenty feet of perimeter. Noise is not proof of performance.
The rim joist and framing zone deserve more attention
One of the most overlooked areas in basement moisture investigations is the band where the foundation meets the framing above, often around the rim joist and sill plate. Air leaks in this area can pull humid outdoor air into cooler basement conditions, leading to condensation on wood and fasteners. In some homes, minor exterior bulk water entry at grade transitions also shows up here before moving downward.
Staining, darkened wood, rusty nails, and localized mildew smell near the ceiling line of the basement can all point to problems in this zone. If insulation is present, especially batt insulation tucked between joists, pull back a section carefully and inspect behind it. Wet or compressed insulation loses effectiveness and can hide long-term moisture exposure.
This area matters because moisture damage to framing components can progress quietly. A basement floor puddle gets attention right away. Slow rot at a sill plate can go unnoticed for years.
How to inspect after rain, not just during a dry weekend
The best time to look for weak points is after the conditions that stress the system. A bright, dry Saturday tells you less than the day after a soaking rain.
Use a methodical walkaround. Start outside and trace roof runoff, low spots, pooling water, and any soft saturated areas near the house. Then move indoors and inspect wall bases, corners, utility penetrations, the sump area, and any spots where stored items have blocked your view in the past.
This short checklist helps keep the inspection focused:
- Check gutters, downspouts, and discharge points first
- Walk the grade and note any slope toward the house
- Inspect wall-floor joints, corners, and cracks for fresh dampness
- Look at window wells, utility penetrations, and the rim joist area
- Test the sump pump and confirm discharge is flowing freely
Photos help more than memory. Moisture patterns can be subtle, and comparing images from storm to storm often reveals whether a problem is stable, worsening, or tied to a specific weather event.
The trade-off between interior and exterior solutions
Once you identify a weak point, the next question is usually how to address it. This is where judgment matters. Not every problem calls for excavation, and not every interior system is a shortcut.
Exterior waterproofing addresses water before it enters the foundation wall. When done properly, it can be highly effective, especially for walls with chronic exterior saturation, failed damp-proofing, or significant crack pathways. The downside is cost, disruption, and access. Decks, porches, tight property lines, and mature landscaping can make exterior work expensive or impractical.
Interior drainage systems manage water that reaches the foundation by directing it to a sump and discharge point. They can be reliable and cost-effective for seepage at the cove joint or through block walls, especially when paired with drainage matting or vapor management. The trade-off is that they do not stop water from contacting the exterior face of the wall. In some situations that is acceptable. In others, especially where wall integrity or finish protection matters, it is only part of the answer.
Surface drainage corrections often deliver the best value per dollar. Extending downspouts, regrading a problem side yard, adding swales, or correcting a settled slab can dramatically reduce water pressure on the foundation. These fixes are not glamorous, but they solve a large share of basement moisture complaints when chosen correctly.
When weak points signal a bigger problem
Some moisture issues are simple. Others are warning lights for larger structural or site drainage concerns. If you see bowing walls, significant horizontal cracking, repeated water entry despite previous waterproofing work, or signs that the foundation is moving, bring in a qualified professional. The right person may be a waterproofing specialist, a drainage contractor, or a structural engineer, depending on what the symptoms suggest.
The goal is not to overreact to every crack or damp smell. It is to recognize patterns that exceed routine maintenance. Water is persistent, and deferred action tends to make repairs more invasive and more expensive. A small seep today may become damaged flooring, mold remediation, ruined storage, and framing repairs later.
What a strong defense really looks like
The strongest Basement Waterproofing defense is layered. Roof water is captured and directed away. The grade sheds water rather than collecting it. Exterior hardscapes pitch properly. Foundation walls are monitored for meaningful cracks and seepage patterns. Openings such as windows and penetrations stay sealed. Interior humidity is controlled. Pumps and drains are tested, not assumed. That is what resilience looks like in a real house.
Most weak points reveal themselves early if you know where to look and inspect with enough honesty. The trouble starts when homeowners normalize the signs. A little musty smell. A little white residue. A little dampness after heavy rain. Those small signals are usually the basement telling you your defenses are thinner than they should be.
If you treat the basement as a system instead of a single surface problem, the diagnosis gets clearer. You stop chasing symptoms and start finding causes. That is how you protect the space, the structure above it, and the money you would rather not spend on preventable repairs.
ARD Waterproofing
98 Smull Ave, West Caldwell, NJ 07006, United States
+1 917-691-8411
FAQ About Basement Waterproofing
Can you 100% Waterproof a Basement in West Caldwell?
A properly designed system can substantially reduce basement water intrusion, but no method can promise protection against every flood, equipment failure, or future change in site conditions. The first step is identifying whether moisture comes from surface runoff, groundwater, plumbing, or condensation. Solutions may include grading and gutter improvements, drainage, foundation repairs, and a sump system. Review the specific coverage and exclusions of any written warranty.
How much does it cost to professionally waterproof a basement in NJ?
There is no single price that fits every basement. Cost depends on the cause of the leak, the area needing work, access, excavation requirements, drainage design, sump equipment, and restoration of disturbed finishes or landscaping. Request an on-site assessment and an itemized written estimate that explains the scope, exclusions, and maintenance requirements before comparing proposals.
How long does foundation waterproofing last in West Caldwell, NJ?
Service life varies with the waterproofing materials, installation quality, soil and water conditions, and maintenance. Drainage components and pumps may require servicing or replacement even when other parts of the system remain functional. Keep gutters, drainage outlets, and sump equipment maintained, and have recurring leaks or changes in foundation condition assessed. Ask for product-specific expectations and written warranty terms rather than relying on one lifespan for the entire system.